
Short Answer
To create a retirement report in the planner, update the plan first, review the major tabs, write your plan notes, then open Report from the toolbar at the top of the planner. Tick the report options you want, read the preview through, and use its Print / Save as PDF button. The report should be treated as a planning snapshot, not as a permanent answer.
The most useful retirement report explains what assumptions were used, what results appeared, what risks were flagged, and what questions need follow-up.
Key Takeaways
- Update the plan before creating the report.
- Review Plan Health and Plan Confidence before printing.
- Write notes about assumptions, quotes, source dates, and open questions.
- Three toggles decide what else goes in: your notes, AI commentary, and the full calculations.
- Notes do not print unless Include notes is ticked, so check the toolbar first.
- Read the preview in full, then use its Print / Save as PDF button.
- Create one report for the base plan and one for the alternative that matters.
- Use manual JSON export/import separately for plan backup and transfer.

See a finished report before you make one
A fourteen-page PDF the planner produced from a real plan, for a single filer retiring at 62 with a horizon of age 90. It runs from the cover metrics through every phase, the charts and Monte Carlo, to the twelve stress scenarios and the assumptions page. All three optional toggles are off in it, so this is what the report prints by default. Further down there is a second example with one of them switched on, for comparison.
Open the example reportWhat The Report Feature Does
The Report button sits in the toolbar at the top of the planner, beside Export, Import and Saved plans. It turns the plan into a readable planning snapshot you can scroll through on screen before anything is printed.
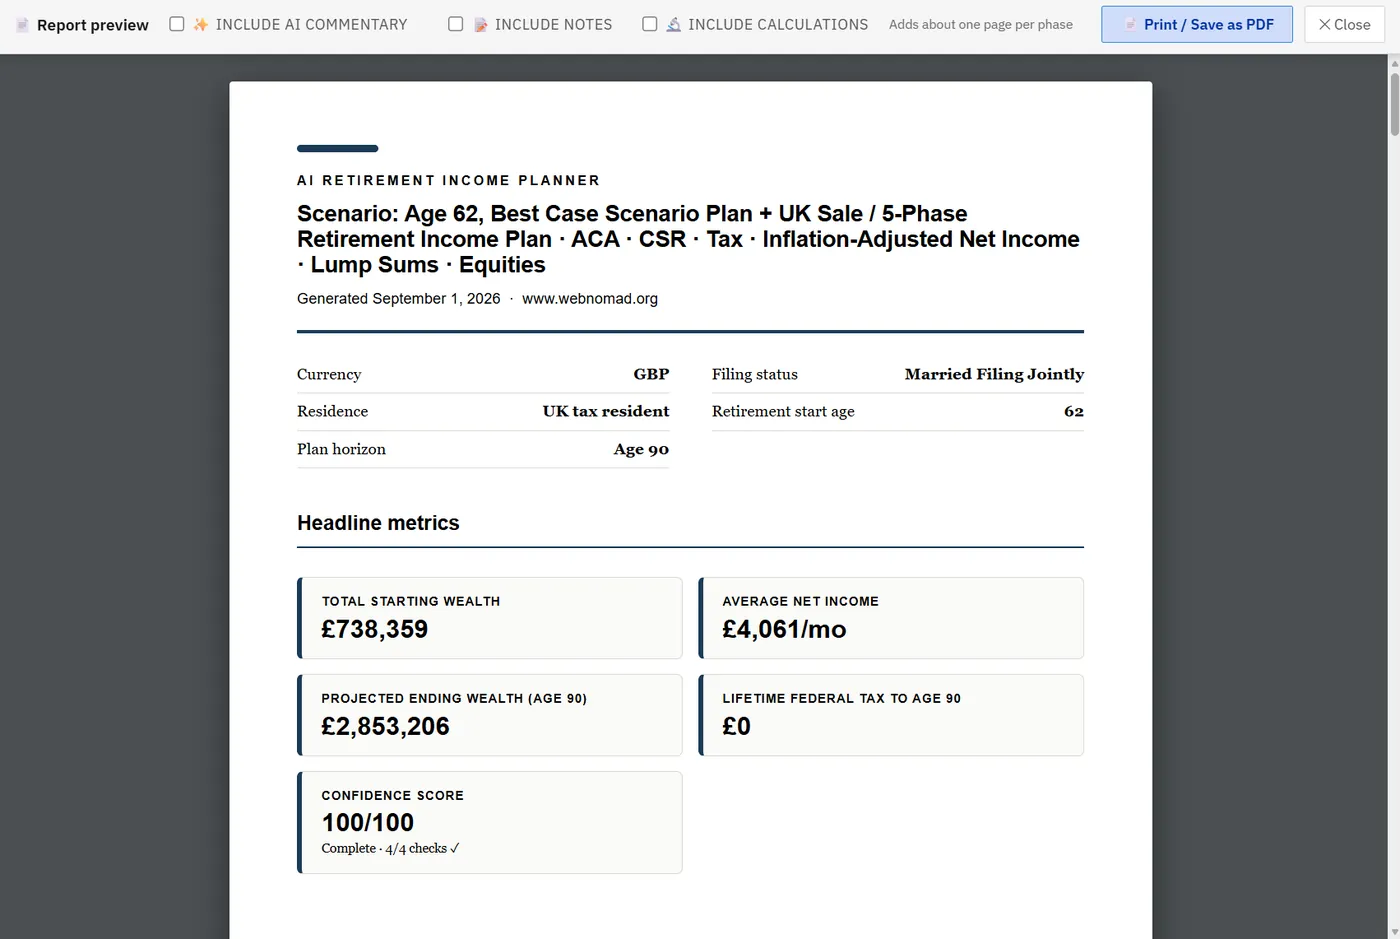
You do not assemble the report. It is built from the plan itself, and it opens on a cover page carrying the plan's title, the date it was generated, and the settings the whole projection rests on: currency, filing status, residence, retirement start age and plan horizon. Beneath those sit the headline metrics, including total starting wealth, average net income, projected ending wealth, lifetime federal tax and the Plan Confidence score.
After the cover it runs through:
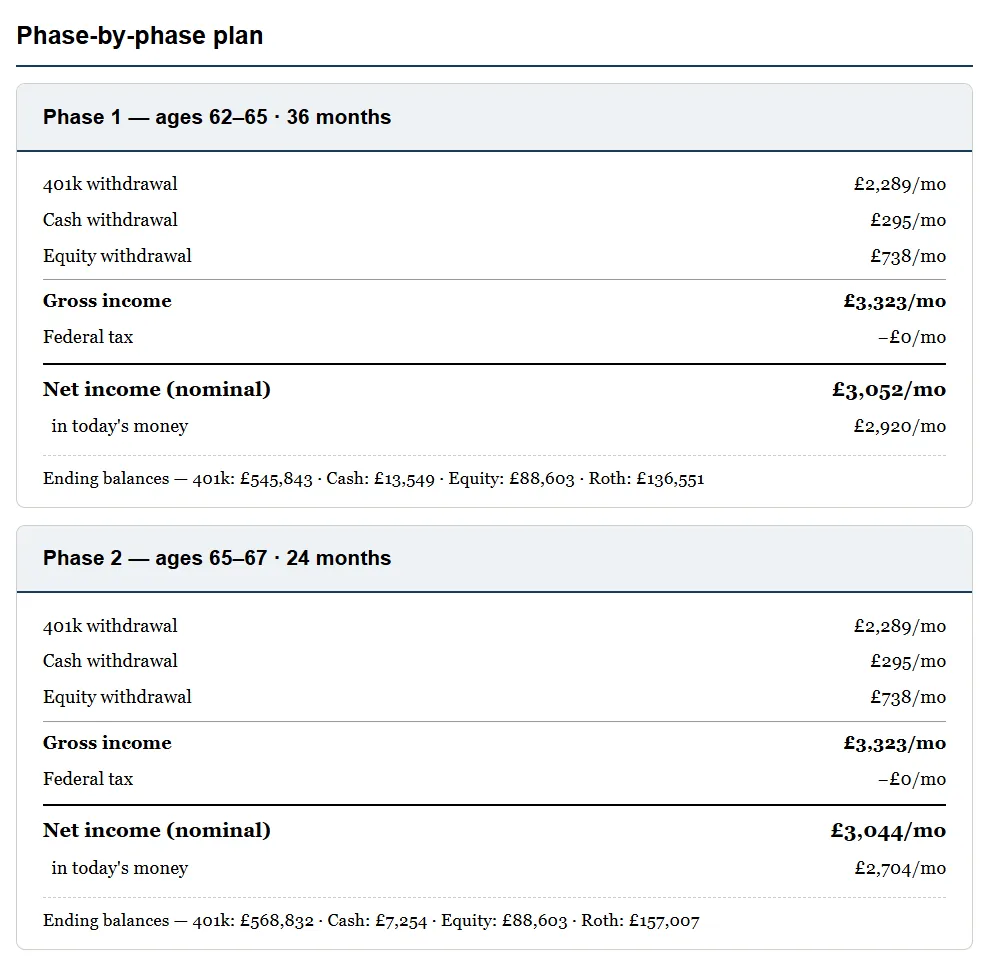
- The phase-by-phase plan, one block per phase, with the amounts drawn from each account, gross income, tax, and net income in both nominal terms and today's money.
- Balance and legacy considerations, the balance trajectory, and how the account mix shifts between the start of the plan and the end.
- Plan resilience, which prints the Monte Carlo result and the stress-test grid.
- Plan strengths, top risks, any risks you have acknowledged, your goals if you have set them, and a list of recommended next actions.
- Key assumptions and tax parameters, the section that makes the numbers checkable months later.
- An educational disclaimer.
Three toggles in the report toolbar decide what else goes in: your notes, AI commentary, and the full calculations behind each phase. All three are off until you tick them, and they are covered further down.
The report is for reading, sharing, reviewing, and documenting assumptions. The JSON export is for backing up or transferring plan data.
Use both when appropriate.
When To Create A Report
Create a report when you want a clear record of the plan.
Good times include:
- After building the first complete retirement plan.
- Before discussing the plan with a spouse.
- Before meeting with a tax professional, financial planner, insurance professional, or estate attorney.
- After comparing scenarios.
- After running Plan Health checks.
- After updating balances each year.
- After using Replan, which re-anchors the plan to your current age and balances.
- After modeling a major change such as Social Security timing, Roth conversions, annuity income, downsizing, or a large expense.
- Before making a decision that needs further review.
Do not create the report too early. A polished report built on unfinished inputs is misleading in a way a rough one is not, and if the plan itself is still half-built, setting the plan up properly comes first.
Before You Open Report Preview
Review the plan first.
Check:
- Current ages.
- Spouse age, if applicable.
- Retirement start age.
- Current balances.
- Cash reserves.
- Taxable, tax-deferred, Roth, and other accounts.
- Social Security assumptions.
- Pension and annuity income.
- Work or part-time income.
- Spending.
- Healthcare costs.
- ACA, Medicare, and IRMAA assumptions.
- RMD settings.
- Roth conversion assumptions.
- Lump sums and one-time expenses.
- Survivor assumptions.
- Inflation assumptions.
- State tax settings, if applicable.
- Residency and currency settings, if applicable.
Then review the main outputs:
- Income chart.
- Balance chart.
- Tax results.
- Healthcare results.
- Plan Health checks.
- Plan Confidence.
- Stress test.
- Monte Carlo.
- Historical backtesting.
- Scenario comparison.
The report should come after the review, not before it. Plan Health is the quickest of those passes to read, and it is worth knowing what each Plan Health check is actually testing before you print a page that lists them all.
What To Include In Notes
Notes are where the report becomes more useful, and they are the one part of it you write yourself.
They live in Saved plans, in a box headed Plan notes below the slots. Basic Markdown works there, so bold text, bullets and short headings all survive into the printed report. Notes are part of the plan rather than part of the browser, which means they are saved automatically, carried into a saved slot, and written into an exported JSON file.
One thing to watch: notes do not print unless you ask for them. Include notes sits unticked in the report toolbar by default, and it stays grayed out entirely until the plan has notes in it.
Add short notes about:
- Date of the review.
- Purpose of the report.
- Scenario name.
- Assumptions that are placeholders.
- Assumptions that came from official sources.
- Assumptions that came from account statements.
- Social Security estimate date.
- Pension quote date.
- Annuity quote date, if applicable.
- Healthcare quote source.
- Tax assumptions to verify.
- Professional questions.
- Known missing items.
- Next review date.
Good notes are plain and practical.
Example:
Base plan updated July 2026 using June 30 account balances. Social Security estimates still need to be checked against SSA records. Healthcare costs are placeholders until open enrollment quotes are available.
If the report marks the end of a review rather than the middle of one, set the plan status chip at the same time. Marking a plan as signed off records the date and starts a twelve-month reminder, which is a more reliable next review date than one written into a note and forgotten.
How To Create The Report
Use this workflow:
- Open the saved plan.
- Update balances and assumptions.
- Save the current version to a slot if you are about to test changes.
- Review Plan Health checks.
- Review Plan Confidence.
- Review charts and key results.
- Write your plan notes in Saved plans.
- Edit the title line under the planner's heading, because that line is what prints as the report's headline.
- Open Report from the toolbar at the top of the planner.
- Tick Include notes, and tick Include calculations if your reader needs to see the working.
- Tick Include AI commentary if you want the plain-English layer and have a key set up.
- Read the whole preview before printing.
- Use the Print / Save as PDF button in the preview toolbar.
- Save the PDF with a clear date in the file name.
- Export the JSON separately if you want the editable plan data.
Include calculations is the step most people skip. It prints the working behind each phase, and that is what turns a report into something another person can check rather than take on trust. Be ready for the length: the toolbar hint says it adds about a page per phase, but in the worked example below it runs to sixteen pages for five phases, so closer to three pages each.
See what Include calculations adds
A second worked example, run on a different plan, with the box ticked. The first thirteen pages are the ordinary report; then five sections show the working behind each phase, bracket by bracket, including how the tax thresholds were inflated and how Medicare was estimated. That is the whole difference between the two files: one toggle.
Open the worked exampleThe report should be easy to understand months later.
How To Name A Report
Use a simple file naming system.
Examples:
Retirement-Plan-Base-2026-07.pdfRetirement-Plan-Delay-Social-Security-2026-07.pdfRetirement-Plan-Roth-Conversion-Test-2026-07.pdfRetirement-Plan-Annual-Review-2026.pdfRetirement-Plan-Survivor-Scenario-2026-07.pdf
The date matters because assumptions change.
Two of those names are yours to set and one is not. The PDF takes whatever the browser's save dialog offers, so it is worth typing a real name there rather than accepting the default. The JSON export names itself, from the plan's title line and the day you exported it, and adds a signed-off prefix once the plan has been signed off. The report also prints the date it was generated on its cover page, so even a badly named PDF can be dated from the inside.
What A Useful Report Should Answer
A useful retirement report should answer:
- What plan is this?
- What assumptions were used?
- What income sources are included?
- What spending level is modeled?
- What accounts fund withdrawals?
- When does Social Security begin?
- Are pensions or annuities included?
- What taxes are modeled?
- What healthcare assumptions are modeled?
- What happens to balances over time?
- What risks did Plan Health flag?
- What does Plan Confidence show?
- What happened under the stress test and Monte Carlo?
- What alternate scenarios were compared?
- What questions still need review?
If the report does not answer those questions, add notes before saving it.
Most of that list is already printed for you. Two things are not, and both need a note.
The historical backtest does not print. The resilience page carries Monte Carlo and the stress-test grid only, so if replaying the plan through real market history is what changed your mind, write down what you saw. The two lenses answer different questions, and how Monte Carlo and historical backtesting differ is worth being clear about before you summarize either one.
A comparison between two saved plans does not print either. The report is always the plan currently loaded, so a side-by-side lives on screen, not on paper. If the comparison is the point, say in your notes what the other version did and why you did not choose it.
What To Do With Optional AI Commentary
Optional AI commentary can appear in the report when AI is configured. The toggle is grayed out until a key is saved in the AI Chat tab. Once it is, ticking it writes a plain-English summary onto the cover page and a short narrative under each strength and each flagged risk.
The figures are not the model's. The request hands it the numbers the planner has already calculated and tells it to use only those, so the commentary is an explanation layer over the deterministic report rather than a second opinion on it.
It is also editable. Click any commentary paragraph in the preview and rewrite it in place; the edits survive switching the commentary off and back on. If a sentence reads as overconfident or a caveat is missing, fix it there rather than printing it and explaining it afterwards.
Review AI commentary for:
- Wrong assumptions.
- Overconfident language.
- Missing caveats.
- Confusion between scenarios.
- Tax, Social Security, Medicare, or legal statements that need verification.
- Suggestions that should be tested before action.
AI commentary should help explain the report. It should not replace the numbers, the planner result, or professional review.
Report Preview Vs JSON Backup
Report preview and JSON export serve different jobs.
Use report preview when you want:
- A readable plan summary.
- A PDF for review.
- A printout for a meeting.
- A record of assumptions.
- A spouse-friendly overview.
Use JSON export when you want:
- An editable backup.
- Transfer to another browser or device.
- A way to preserve the underlying plan data.
- A copy before testing major changes.
One limit is worth knowing. The export carries the plan currently loaded, notes included, but not the saved-plan slots. Those live in this browser only, there are three of them, and they do not travel in an exported file. If a scenario matters enough to keep, export it as its own JSON file rather than trusting a slot to still be there. Saving, loading and comparing scenarios goes through how the slots behave.
The PDF is for reading. The JSON file is for restoring the plan.
A Retirement Report Workflow, Start To Finish
Imagine a couple doing an annual retirement review.
They update:
- Account balances.
- Social Security estimates.
- Pension income.
- Spending.
- Healthcare assumptions.
- Roth conversion plan.
- RMD start age.
- Survivor assumptions.
Then they test the alternatives one at a time: a lower-spending version, a delayed Social Security version, and a Roth conversion version. There are three saved-plan slots, and a comparison runs one slot against the plan currently loaded, so this is a sequence of pairwise reads rather than a four-way table.
They review Plan Health and Plan Confidence for each version.
Then they create one report for the base plan and one for the alternative that changed their thinking. Their notes explain which assumptions still need tax review and which healthcare assumptions are placeholders.
Now the report is more than a printout. It is a decision record, and it is the part of an annual plan review that survives the year.
Common Retirement Report Mistakes
Avoid these mistakes:
- Creating a report before updating inputs.
- Leaving the title line at its default, so every PDF is headed the same way.
- Writing notes and leaving Include notes unticked, so none of them print.
- Leaving placeholder assumptions unexplained.
- Printing without reading the preview.
- Treating a PDF as an editable backup.
- Forgetting to export JSON separately.
- Including AI commentary without review.
- Comparing reports from different dates without checking assumptions.
- Sharing a report before removing details you do not want shared.
- Treating the report as a substitute for professional review.
A retirement report is only as good as the plan behind it.
What To Do After Your First Retirement Report
After creating the report, consider creating a second report for one alternate scenario.
Useful comparisons include:
- Base plan versus later Social Security.
- Base plan versus smaller annual spending.
- Base plan versus Roth conversion scenario.
- Base plan versus annuity income scenario.
- Base plan versus downsizing scenario.
- Base plan versus survivor scenario.
- Current plan versus a Replan from your current age and balances.
Keep the number of reports manageable. A few clear reports are better than a pile of unlabeled PDFs.
FAQ
Can the planner create a printable retirement report?
Yes. Report preview renders the whole plan as a formatted document, and its Print / Save as PDF button hands that document to the browser's own print dialog, where saving to PDF is one of the destinations.
Is the PDF the same as a backup?
No. A PDF is a readable copy. Use manual JSON export/import when you want an editable backup or transfer file.
Can AI commentary be included in the report?
Yes, when AI is configured. Review the commentary carefully and verify important tax, healthcare, Social Security, Medicare, insurance, legal, and investment details.
Should I create a report for every scenario?
No. Create reports for the base plan and the most important alternate scenarios. Too many reports can make review harder.
Can I give the report to a professional?
Yes, if you are comfortable sharing the information. A report can help organize a meeting, but professionals will still need to verify assumptions and rules.
Source Links
- AI Retirement Income Planner: https://airetirementincomeplanner.com/
- WebNomad AI Retirement Income Planner feature page: https://webnomad.webflow.io/pages/ai-ready-retirement-income-planner
- Investor.gov retirement planning resources: https://www.investor.gov/introduction-investing/investing-basics/glossary/retirement-planning
- IRS required minimum distributions: https://www.irs.gov/retirement-plans/plan-participant-employee/retirement-topics-required-minimum-distributions-rmds
- IRS: are my Social Security benefits taxable: https://www.irs.gov/help/ita/are-my-social-security-or-railroad-retirement-tier-i-benefits-taxable
- Medicare costs: https://www.medicare.gov/basics/costs/medicare-costs
Educational Disclaimer
This article is for general education only. It is not financial, tax, investment, legal, healthcare, insurance, Social Security, Medicare, estate, AI safety, software, or retirement advice. A retirement report is a planning snapshot based on assumptions and user-entered data. Confirm tax, Medicare, Social Security, RMD, withdrawal, investment, insurance, healthcare, inflation, estate, and software details with official sources and qualified professionals. Screenshots show a sample plan with invented figures and are illustrative only.